Some of my favourite XIB and cell articles have been:
- http://www.alexyork.net/blog/2011/07/18/creating-custom-uitableviewcells-with-monotouch-the-correct-way/
- http://www.arcticmill.com/2012/05/uitableview-with-custom-uitableviewcell.html
- and especially http://software.tavlikos.com/2011/04/03/uitableviewcell-nib/ (warning - this one is delightfully technical!)
Using these as inspiration, and using my own Mvvm-slanted view on C# mobile architecture, I've developed my own way of working with XIBs.
This post (and the accompanying video) describes the way I work.
Pleas note that I'm nowhere near brave as Alex York was - I'm not going to call this post 'the correct way'. Instead, I just hope you find it helpful.
If you have some other way of working, please let me know :)
Stuart
Pleas note that I'm nowhere near brave as Alex York was - I'm not going to call this post 'the correct way'. Instead, I just hope you find it helpful.
If you have some other way of working, please let me know :)
Stuart
----
tl;dr - can I watch?
If you want to watch instead of read, then I've uploaded an hour long video (sorry it's so long!) to YouTube:
----
tl;dr - I can see the code?
If you want to see the code.... then it's in GitHub in:
- baseline code - https://github.com/slodge/MvvmCross-Tutorials/tree/master/MonoTouchCellTutorial.BaseLineForDemo
----
But for the readers....
This walkthrough is all about a demo Pet Shop Management app
1. Create a basic application
To start with, we have a simple MvvmCross MonoTouch app - just putting everything in one single project.

Within this basic application we have:
- Core
- Interfaces - defining the interfaces for our business logic
- Models - some Animal classes - Kittens and Dogs
- Services - some business logic - providing implementations for IAnimalSupplier and IPricingModel
- ViewModels - we provide 2 simple ViewModel's here
- PetShopAnimalViewModel - links an Animal to its Price and also provides ICommand's to allow the Animal to be sold and the Price to be adjusted.
- PetShopViewModel - provides some ICommands to allow the pet shop owner to buy animals, and provides an ObservableCollection of PetShopAnimalViewModel's
- App.cs - a very simple IoC bootstrapper registering AnimalSupplier and PricingModel singletons.
- UI
- Empty to start with (no Views)
- A Setup.cs which just creates the App from Core, and which tells MvvmCross where to find the plugins it needs for File and for DownloadCache (both of these are used in showing images from the web).
- A slightly modified AppDelegate - the modifications change the UIKit app startup so that it will create a Setup.cs instance and will then ask MvvmCross to 'NavigateTo' a PetShopViewModel.
Notes:
- I never write commercial apps this way - for commercial apps I split the logic out into testable, reusable PCL class libraries - but for demo, this approach is OK here.
- The ViewModels here contain too much logic - normally, you'd put the logic in a Model or Service behind the ViewModel - but for demo, this approach is OK here.
2. Create a Kitten Cell
We want a UITableViewCell which will be used to display Kittens when they are in a Table
2.1 Create a C# class
In order to create the Kitten Cell, the first thing we do is to create an empty class, KittenCell.cs
In that class, we then:
- Make the class partial
- Change the inheritance of the class to MvxBaseBindableTableViewCell
- Add a [Register("KittenCell")] attribute - registering the cell with iOS/UIKit
- Add a NSString Identifier for cell reuse
- Add an empty BindingText constant string
- Change the default constructor so that it passes BindingText to base
- Add a IntPtr constructor which passes BindingText and the IntPtr to base
This should create something that looks like:
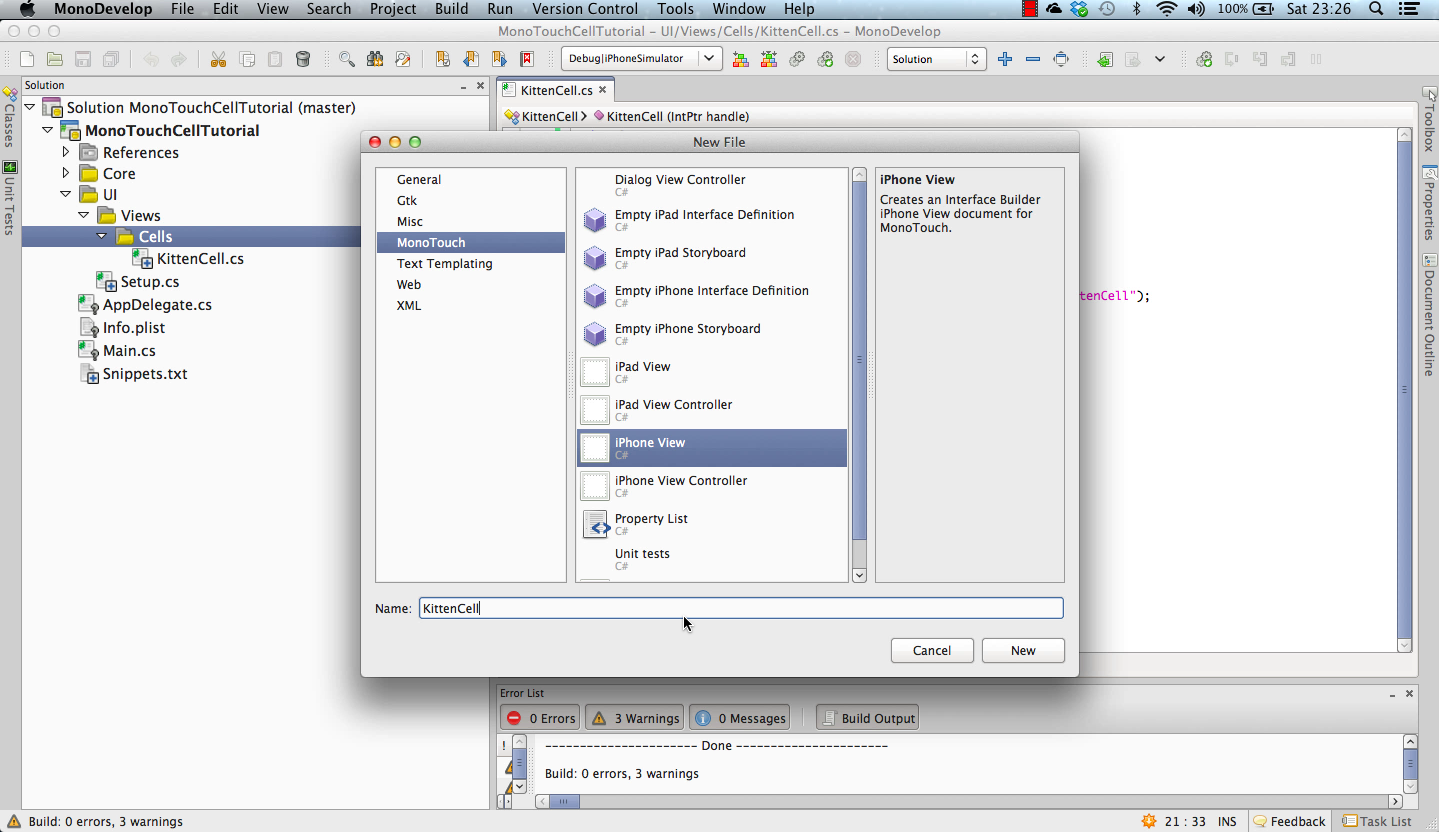
2.2 Create a KittenCell XIB
With the KittenCell.cs class created, then we can now create an XIB. To do this we use one of the iPhoneView or iPadView templates in File|New - doesn't matter which we choose - they both just create an XIB for us:
2.3 Replace the KittenCell XIB contents with a TableViewCell
With that XIB created, double-click it to open it in xCode4.
It will look like a full page...
We don't want a full page - so we delete it.
Then we use the library (bottom right) to drag a Table View Cell on to the design surface instead:

2.4 Link the TableViewCell back to the KittenCell
We now want to link this Table View Cell back to our C# class - the one with the [Register("KittenCell')] attribute.
To do this we use the Custom Class property:

NOTE: the xCode property editor has a nasty little trick of losing things you enter into text boxes - to avoid this, please make sure you switch the focus away from text boxes before you change tabs within the property inspector.
2.5 Set the reuse Identifier to KittenCell
This is easily done using the ReuseIdentifier field - this needs to be set to the same as our NSString Identifier used in C# earlier:

Note: generally, I just recommend trying to keep all your names aligned - if you use "KittenCell" for all of the file name, the reuse identifier, the XIB name, etc, then you will find it easier to avoid slippy-finger-typo mistakes.
2.6 Place subviews and set their properties in order to create your cell layout
This walkthrough isn't about how to use the XIB editor itself...
It's just drag/drop and property setting...
So I'll just fast forward to the cell I created:

2.7 Open KittenCell.h in the Assistant Editor
Because of the work we did in 2.1 when we created our C# class, and because of some magic that the Monkeys inside MonoTouch and MonoDevelop do for us, then Xcode will have a file called KittenCell.h available.
To see this file, highlight the TableViewCell in Objects (left middle), and then choose View|Assistant Editor|Show Assistant Editor in the menu.

The Assistant Editor will show the KittenView.h file like:

2.8 Create Outlets for the subviews we've created
As far we we're concerned here, Outlets are just links from the XIBs back to private C# properties back in our KittenCell.cs class.
To create them, choose one of the following mechanisms in order to find the "New Referencing Outlet" option:
- Right-click (or Ctrl+Click) on the child view in the Objects pane
- ... or ... Right-click (or Ctrl+Click) on the child view in the design surface
- ... or ... Select the child view in either the Objects pane or the design surface, and then choose the Outlets tab of the Properties pane
Once you've done this you can then drag the + across from the "New Referencing Outlet" into the KittenCell.h file shown in the Assistant Editor:

When you drop this link, you will be asked for a name - use a sensible C# Property name - e.g. KittenImageView for a UIImageView which we will use to show the Kitten's Image from the web:

Once we've done that for all the subviews in our current design, the Xcode display should look a bit like:

2.9 Back to MonoDevelop and C# - a designer file
By this stage, our Cell is pretty much finished :)
So now, we need to choose File|Save in Xcode.
Then we can switch back to MonoDevelop.
When you do, you'll notice that MonoDevelop is a bit sluggish to respond...
... and if you look at the status bar, then you may see some messages about things like 'Updating from Xcode'
After a couple of seconds this sluggishness will end, and you'll notice that the Xamarin monkeys inside MonoDevelop have now created a KittenCell.designer.cs file which contains properties which map to the Outlets we created in the designer:

2.10 Bind the UI to the ViewModel
In this walkthrough, we simply add some C# public properties and some simple MvvmCross Swiss-format binding text to hook up the C# cell to these properties.
This creates code like:
Notes:
- we haven't hooked up the UIImageView yet - we'll do that 'soon'
- we have just used very simple int and bool Properties here in our KittenCell for things like Price and IsLitterTrained. In full maintainable code, I would often use ValueConverter to help with some of these - but that's a separate article.
- If you aren't using MvvmCross, then you'll have to replace this step with some alternative - e.g. you could just use some kind of SetKitten(Kitten kitten) method which you can code to set the UILabel properties like Text, Hidden, etc.
3. Add a DogCell
To add a second type of cell, we just repeat the same steps...
At the end you'll end up with something like:

With C#
4. Adding the 'View' UIViewController - again using XIBs
We now have our:
- Core code with Models, Services and ViewModels
- KittenCell - XIB and C#
- DogCell - XIB and C#
So the next step is setup a 'Page' or 'Top Level View' - an MvvmCross 'View' to show a UITableView in which we'll list the pet shop's Stock.
4.1 Create the iPhone UIViewController
Use File|New in MonoDevelop to create an iPhone View Controller called PetShopView

This will create a UIViewController - which is three files:
- PetShopView.cs
- PetShopView.designer.cs
- PetShopView.xib
However, because we're using MvvmCross with binding, we want to change this to an MvxBindingTouchViewController
To do this we edit PetShopView.cs so that:
- the class inherits from an MvxBindingTouchViewController templated on a PetShopViewModel
- the constructor in so that it uses an MvxShowViewModelRequest.
4.2 Design the UI - edit the XIB for the PetShopView
Double-click on PetShopView.xib in order to open the XIB in Xcode.
This time, we will keep the basic 'full page' layout handed to us by the wizard.
For content design, we'll then add two subviews - a UIButton at the top and a UITableView beneath.

If you watch the video, you'll also see how we 'dock' these so that the UI can be used on 4" iPhones as well as 3.5" ones.
4.3 Create an Outlet... and also an Action
Within Interface Builder (Xcode) we can use the Assistant View again along with Right-Clicking in order to add:
- an Outlet for our UITableView called TableView
- an Action for the UIButton sent event TouchUpInside called AddButtonClicked

With this done, our interface design is complete - so choose File|Save in Xcode
4.4 Back to MonoDevelop - let the Monkeys generate a designer file
Switching back to MonoDevelop, you'll see another short delay while the Xamarin Monkey's do their wonderful work.
They'll regenerate the PetShopView.designer.cs file for us - and it will now contain:
Note that the Action has been integrated as a C# partial method - these are 'optional' methods in C# partial classes. This is not a commonly used language feature - well, I've never used them much - but they're a very nifty way of working here with these Interface Builder actions.
For more on partial methods, see http://msdn.microsoft.com/en-gb/library/wa80x488.aspx
4.5 Handling the Add Button press
To handle the Add, we simply implement the partial Action method in our main PetShopView.cs class file.
In this sample we choose to implement this using an UIActionSheet:
4.6 Implementing the TableSource
All UITableView's need a UITableViewSource to supply their data and their cells.
In our case we add this using:
- A nested class that inherits from MvxSimpleBindableTableViewSource
- During its constructor
- This source uses tableView.RegisterNibForCellReuse to register the KittenCell and DogCell XIB files (these get compile to NIB files)
- This source also sets up some simple animations which happen during adding and removing cells - these animations are automatically triggered from ObservableCollection.
- The Source overrides GetOrCreateCellFor
- in order to select the correct cell type Identifier based on the data to display
- and then uses tableView.DequeueReusableCell() in order to ask the UITableView to either get a new cell or to reuse a pooled one.
- The class also overrides GetHeightForRow in order to accommodate our different cell heights.
In code this is:
Note: this code may surprise semi-experienced MonoTouch developers. The reason is because these particular overloads of RegisterNibForCellReuse and DequeueReusableCell calls were new in iOS6.
If you want to learn more about the new API try the excellent UICollectionView seminar at http://dotnetmobilepodcast.blogspot.co.uk/2012/11/introduction-to-collection-views-in-ios.html
4.7 Data-Binding the TableSource
We now need to hook the TableSource up to the UITableView from the XIB, and to the Stock ObservableCollection from the PetShopViewModel
To do this, we just add some code to the PetShopView's ViewDidLoad method:
5. Run!
Finally we have our complete:
When we hit 'Run' we can see our UI and we can interact with it to add Kittens and Dogs:

Note that the Dogs and Kittens are displayed in different Cells with different heights:

- Core - with Models, Services, ViewModels, App
- UI - with DogCell, KittenCell and a PetShopView
When we hit 'Run' we can see our UI and we can interact with it to add Kittens and Dogs:

Note that the Dogs and Kittens are displayed in different Cells with different heights:

6. Adding Images and UI for the PetShopAnimalViewModel ICommands
I'm not going to go through this in detail - you can watch the video if you need detail.
All I will say here is that:
- we can now iterate over our XIB design and our CS code.
- for images we can add an MvvmCross helper object - MvxDynamicImageHelper using UIImage - which can fetch the HTTP images for us
- for the ICommand's we can use auto-properties on the Cell combined with Interface Builder Actions for button presses.
For KittenCell, the interface and code that this editing creates is:

7. A Finished Sample
With everything completed, we now have:
- testable, reusable business logic
- a UI generated from XIBs
- including Cells
- including a PetShowView 'Page'
- dynamic delightful behaviour including simple animations and touch interaction


----
Want to know more?
I hope this walkthrough has been comprehensible - and fairly well self-contained.
----
If you have read, then it might be worth watching too - as I work I do talk about some problems I sometimes encounter - and you get to see some genuine problem solving while I talk.
----
----
If you have read, then it might be worth watching too - as I work I do talk about some problems I sometimes encounter - and you get to see some genuine problem solving while I talk.
----
If you want to know more about MonoTouch - or about iOS coding - then I recommend http://xamarin.com - their documentation team is superb.
Indeed, much of what I've learnt about how to use Tables, Cells, and Sources came from Mike Bluestein's articles, blogs and videos - thanks Mike!
----
If you want to know more about MvvmCross, then check out the repo - http://github.com/slodge/mvvmcross - or check out my Xaminar on the topic - http://dotnetmobilepodcast.blogspot.co.uk/2012/12/mvvmcross-introduction.html
----
And if you've got questions, then please ask them on StackOverflow - http://slodge.blogspot.co.uk/p/if-youve-got-questions.html
----
Thanks for reading!
This walkthrough is all about UITableViewCell and UITableView.
However, the same techniques can be used for the newer UICollectionViewCell and UICollectionView - and these CollectionViews are one of my current favorite toys - I love them!
Further, very similar techniques can be applied for any UIView you might want to load from an XIB rather than from code.
-----
There are some things you could do to which might make this process easier....
----
Final note: Beyond UITableView...
This walkthrough is all about UITableViewCell and UITableView.
However, the same techniques can be used for the newer UICollectionViewCell and UICollectionView - and these CollectionViews are one of my current favorite toys - I love them!
Further, very similar techniques can be applied for any UIView you might want to load from an XIB rather than from code.
-----
If anyone from MonoDevelop or Xamarin reads this...
There are some things you could do to which might make this process easier....
- publish some additional UIView/XIB File|New templates which produce the partial classes and XIBs together (possibly even generating combined iPhone and iPad XIBs)
- consider creating the Outlets as internal or public - then I can more easily bind to them in MvvmCross
- consider changing the generated Actions to internal or public ICommands or EventHandler delegates - then I can bind to them more easily :)
- provide some buttons or menu options that allow me to manually request Xcode file regeneration (in both directions)
- publish more documentation on this - to replace this shambles of an effort :)
Hi Stuart, this is a really nice walk-through and I wish that Xamarin would have documented these fundamentals, it's great you took the effort!
ReplyDeleteFor those base classes, I guess those come with your MvvmCross framework?
Thanks Bart
DeleteI actually think Xamarin's docs team is one of their key strengths - Mike and the others produce some really great content - much easier to use than msdn or apple docs. But yes - the XIB area is possibly one they could do better. Perhaps one reason for this is because as iOS devs get more experienced they often tend to move away from XIBs and into code. It actually took me working with a Newbie again in order to work out half the stuff for this post :)
On the base classes used, yes - they're MvvmCross - but the basic XIB approach should work if you use UITableViewCell, UITableViewController and UITableViewSource as base classes instead
Stuart
Thanks for the quick reply! Yes, I agree that the Xamarin guys are doing a great job in producing docs, it's certainly helpful, especially the samples.
DeleteAlthough I'm a newbie to mobile development, I do see clear benefits of working with XIB's, since it will allow me to easily collaborate with designers and key stakeholders because the UI can be separated from the code. This is also the reason for my interest in MvvmCross.
In fact, I've made a MVVM "framework" of my own and thinking of publishing the implementation as open-source on GitHub.
The difference is that I use a "presenter" as a layer between the ViewModel and Views, to keep them separated, fulfilling a similar role as the bindings in MvvmCross.
I'm wondering though, is there more written documentation about how to define these bindings (in XAML, AXML and iOS code)? I could not find links on the GitHub project page, altghough I did not have a chance to look at the videos yet.
Also, with the code in this blog post, I feel the base classes could be too tightly coupled with iOS' use of delegates in the controllers. What are your thoughts on this?
We've got a presenter too - but it's doing a different job - it determines how Views are shown (whether as pages, as popups, as splitview-panes, etc)
DeleteFor documentation... sorry, haven't had time yet... open to contributions...
For a quick look at one way to do bindings (using the old JSON formats) - see https://github.com/slodge/MvvmCross/wiki/Tutorial-Part-3:-TipCalc
If you want to know how to create custom bindings, there are some posts on here and on StackOverflow.
More more questions like these I really do value StackOverflow - Google indexes it well and it helps generate and spread knowledge
I like the idea of crowd sourced documentation via StackOverflow. It would be handy if you could keep some sort of index on the GitHub Wiki with the most common or popular questions, but no pressure!
DeleteThe MVVM topic itself is a bit complex, especially when you are new to it, and it seems that for MvvmCross there are some specific conventions, therefore increasing the learning curve. A good tutorial (or stepwise index of topics to follow) would really help. The presentations you've made I found to be a good introduction, up next is how to implement.
The link to the binding example is very helpful, thanks, I can get going with this. :-)
There is a big link list - http://slodge.blogspot.co.uk/p/mvvmcross-quicklist.html
DeleteThere are also a couple of people promising to do some documents - and so I don't want to discourage them by doing some myself.
No more comments here now please - some quite lively chat is available in the Jabbr room if you need it, and if not then StackOverflow - http://slodge.blogspot.co.uk/p/if-youve-got-questions.html
Good luck with Mvx and with your own framework too :)
Just one more thing - thanks a lot for the help and maintaining MvvmCross, keep it up! :-)
DeleteHi, great tutorial even for a newbie like me.
ReplyDeleteBut I still have one problem: "MvxBaseBindableTableViewCell" class doesn't actually exists in the package you said, is it normal ?
Try the updated tutorials - all in http://mvvmcross.wordpress.com
Deletethanks i'll check that :)
Delete